


From iOS Dev to full-stack in no time with Booster 🚀
Are you an iOS (or mobile) developer who wants to become full-stack in no time? Keep reading!
The Problem
When developing a new app, it’s important to consider which backend stack to use for data synchronization and storage. No-code or low-code platforms like Firebase are often popular choices for app developers because they provide a range of useful features out of the box. While these tools can be helpful for quickly creating an MVP or getting a simple application into production, they may not be suitable for more complex data sets or situations where robust business logic and scalability are required.

On the other hand, setting up and using complex serverless solutions from scratch can be time-consuming and often require a significant amount of effort. There are many different tools and components to manage, and it can be error-prone and involve a lot of boilerplate code. You want to move fast and care most about your business logic, right? Then keep reading.

The good news is that there’s a new framework called Booster that can make backend development a breeze, even for those who are new to it, thanks to its high level of abstraction.
Why this tutorial?
We are two developers from The Agile Monkeys with a strong background in iOS development, but very limited experience with backend production projects. Despite this, we have successfully used the Booster framework in several production projects! We want to share our experience with you, and for that we have created an open-source iOS app and an open-source Booster backend, as well as written two articles detailing the entire process.
- This tutorial covers the iOS integration of a Booster backend, and you can view the iOS code here.
- The tutorial on the Booster backend can be found here, and the Booster code can be accessed here.
In addition, the iOS application built for this tutorial is available on the App Store. The app, called Live Questions, is a tool for live events, keynotes, and Q&A sessions that allows hosts to create a topic and gather questions from other users in real time.

To be transparent, Booster is actually a framework developed by another team within our company. Our backend and event-sourcing experts have been working on creating this high level of abstraction for years. As iOS developers, we have used Booster as if we were external clients of the tool, and have been extremely impressed with the developer experience and support we have received.

In this tutorial, we will guide you through the process of integrating a Booster backend with an iOS app. We assume that you already have a basic understanding of iOS development.
WTF is Booster?
The world, businesses, and modern software are all driven by events. As app developers, we understand this concept well, as our apps are designed to respond to user actions and various system and environment events. With Booster, you can build reactive backends that follow this event-driven model, while also enjoying a faster development process thanks to its high level of abstraction. In short, Booster allows you to create reactive cloud-based apps efficiently and effectively.

A backend project using Booster is organized, on-rails, into the following components:
- Commands: Actions that users can take within the system (e.g. create a topic).
- Events: Simple records of facts (e.g. user X reacted to question Y on topic Z). As Booster is an event-driven framework, events are central to the design of a Booster project.
- Entities: The source of truth, representing data about the subjects discussed within your company (e.g. topics, questions, users).
- ReadModels: Public projections of Entities. While Entities are private within the system, ReadModels are publicly accessible (e.g. get topics).
- Handlers: Code that processes commands, reacts to events to trigger other actions, or updates Entities based on new events.
For more in-depth information about Booster and its architecture, we recommend checking out the official documentation.
Booster automatically generates a GraphQL API based on your Commands and ReadModels, which is how your app will communicate with the backend. This API also supports real-time updates through subscriptions using a web socket. Using a GraphQL API is easy and offers numerous benefits over traditional REST APIs, making it an excellent choice for app development!
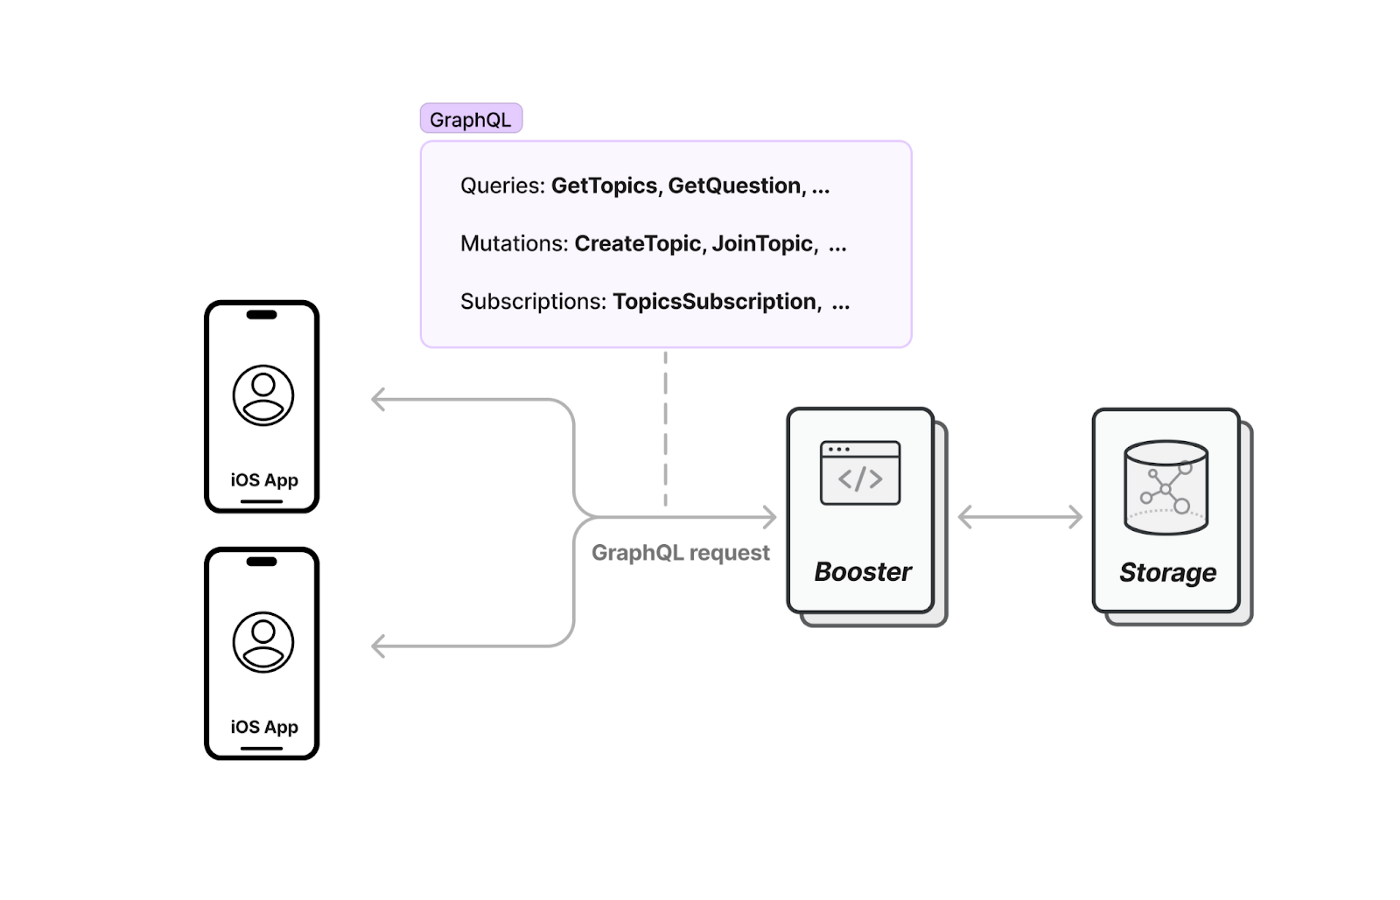
How to use Booster from your iOS app
To make requests to the GraphQL API exposed by our Booster backend, we need to use a GraphQL library. The best option for iOS is the Apollo client.
Once you have completed the process of creating a Booster backend application (we have a tutorial on this here), you can follow these steps:
1. Add the Apollo dependency to your Xcode project
- Open your Xcode project, go to the File tab in the macOS bar, and click “Add Packages”.
- In the Add New Package window, search for “github.com/apollographql/apollo-ios.git” and select “Add Package”.
- In the new window that appears, select “Apollo”, “ApolloAPI”, and “ApolloWebSocket” under “Package Products to add”.
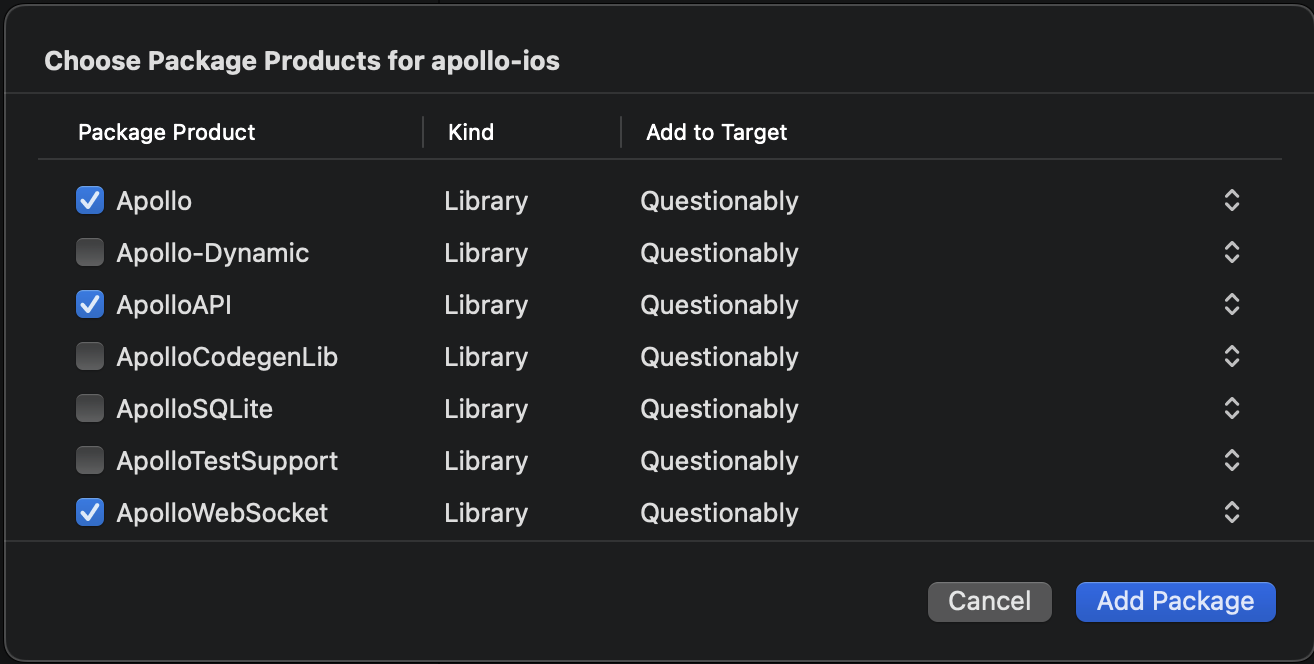
You can check all the other options available to import Apollo into your project here.
2. Set up GraphQL in your project
The Apollo iOS client comes with a command-line interface (CLI) that makes it easy to run code generation, which simplifies the process of working with GraphQL. The CLI will download your Booster GraphQL schema and generate Swift code for your GraphQL queries, mutations, and subscriptions.
Here’s a brief guide on how to use the CLI:
- Download the code generation CLI tool. Go to the list of Apollo iOS releases on GitHub and find the latest release.In the Assets list for each release, you’ll find a pre-built CLI binary called “apollo-ios-cli.tar.gz”. Download and unzip this file, then move the “apollo-ios-cli” binary file into the root directory of your project.
- Initialize the code generation CLI. Open a terminal window at the root folder of your project, and run the following command:
./apollo-ios-cli init — schema-name [SchemaName] — module-type embeddedInTarget — target-name [TargetName]
Be sure to replace “[SchemaName]” with the namespace used to scope the generated schema types, and “[TargetName]” with the name of your iOS app as set in your Xcode project. This will create a new configuration file, “Apollo-codegen-config.json”, in your root folder.
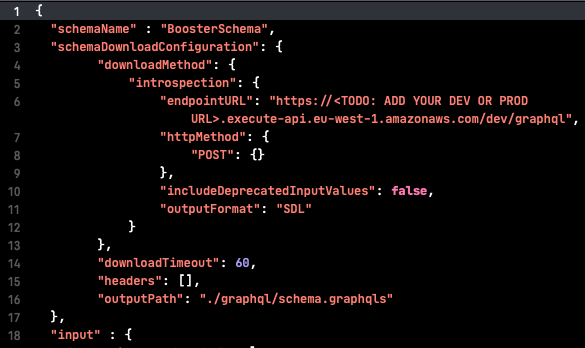
- Add the schema download method to the configuration file. You’ll need to include the “schemaDownloadConfiguration” dictionary in the config file and specify the URL of your schema, which is the Booster GraphQL endpoint:
- Create GraphQL files with your queries, mutations, and subscriptions. These are the requests your app will make to the backend. The Apollo code generation tool will look for these files with the .graphql file extension to create the Swift API code.
The public interface of a Booster application consists of Commands and ReadModels. In GraphQL terms, you use mutations for Booster Commands, and queries and subscriptions for ReadModels.
To see examples of queries, mutations, and subscriptions in action, you can check the iOS project. You’ll also find examples of how to filter ReadModels.
- Run the Apollo Code Generation tool. Execute this command in the terminal. It will download your schema and generate the Swift code for the types defined in it.
./apollo-ios-cli generate -f
- Import the generated files to your Xcode project. Drag the updated “graphql” folder into your project (make sure to remove the reference first if you’re re-adding the folder). You should be able to compile your project and make successful GraphQL calls!

It’s crucial to re-generate the files whenever you make changes to your Booster schema by adding or removing new Commands or ReadModels, or by adding new GraphQL files to your iOS project. This ensures that the frontend and backend are in sync and can communicate effectively.
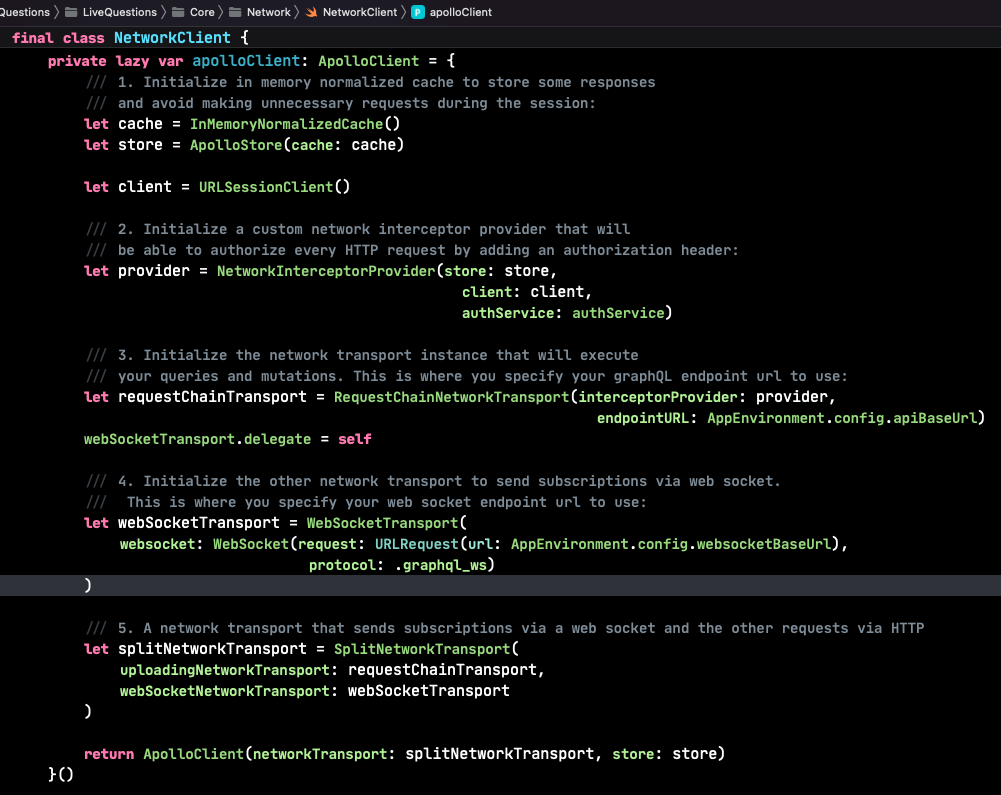
3. Set up the Apollo client
On this project, we needed to execute GraphQL queries and mutations and receive real-time updates via web socket using subscriptions. This way, we can update our UI instantly with any change to our read models. Additionally, we wanted to have an in-memory normalized cache to avoid making unnecessary queries.
Based on those requirements, here is how you could set up the Apollo Client in NetworkClient.swift:
If you want to learn more details about Apollo configurations, you can check the official documentation.
The custom NetworkInterceptorProvider class created in step #2 can be found here. Depending on your application’s requirements, you may choose to implement a custom network transport or use Apollo’s DefaultInterceptorProvider. In this app, we needed to restrict access to Booster’s data to only authorized users, so we implemented a UserManagementInterceptor that adds the user’s access token to the authorization header in each request. However, if your application has different security needs, you may not need to create a custom NetworkInterceptorProvider class.

4. Execute a Query
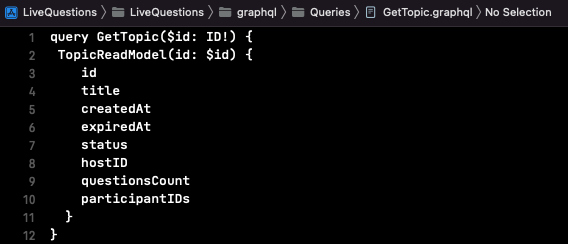
For example, if we try to use the GetTopic query to fetch a topic by id, we could do the following:

GetTopicQuery matches the query we defined in GetTopic.graphql. Notice that we are taking advantage of the new async/await pattern supported in Swift. As it is not supported yet on Apollo 1.0 by default, we added an extension! You can check it out here.
5. Execute a Mutation
Remember that mutations are calls to our Booster Commands. The request is similar to the example above:

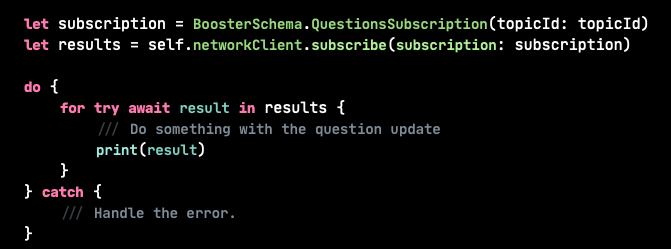
6. Subscriptions!
Booster provides support for real-time updates using subscriptions via WebSocket. We are taking advantage of Swift’s asynchronous sequences for this scenario to receive ReadModels updates.
In this example, we subscribe to any question update that belongs to a specific topic:
User authentication with Auth0

In our project, only authorized users are allowed to access and interact with the Booster backend. To ensure secure access, Booster uses the OAuth 2.0 protocol for authentication. This protocol involves the use of JSON Web Tokens (JWT) to identify and authorize users. These JWT tokens, also known as access tokens, are issued by an authentication provider such as Auth0, which we are using in this project. Other popular providers that support OAuth 2.0 include Firebase and others.
You can create a free account with Auth0 for your experiments. In our articleon configuring the Booster backend, we provide detailed instructions on how to set up user roles and custom claims in the Auth0 token, which Booster uses to authorize operations. For the iOS counterpart, you just need to follow these steps:
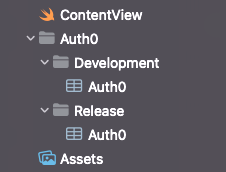
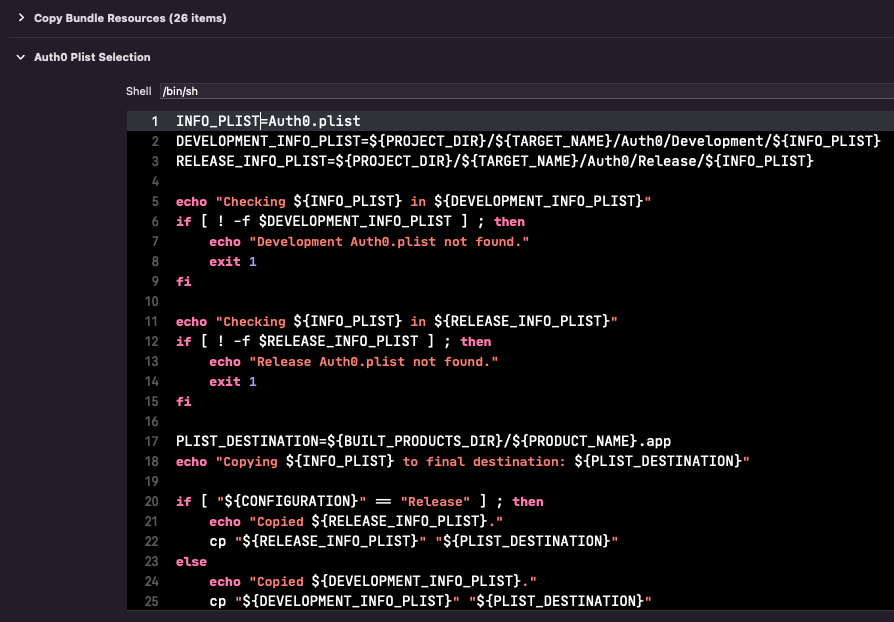
- Create a new native application under Applications in your Auth0 account. Then, follow the official steps to configure the client and obtain the Auth0.plist file for your project. It’s important to note that we have a Build Script Phase called “Auth0 Plist Selection” in our Xcode project, under the LiveQuestions target. This script selects the appropriate Auth0.plist file based on the type of build (development or release). If you only have one environment, you can place the same plist in both folders, or simply remove the script and use a single plist file.
- In AuthService.swift, you can see how we have implemented easy sign in and sign out functionality using the Auth0 framework. It is crucial that you set the audience parameter when signing in, as a missing or incorrect value can result in an incomplete or malformed token. You can use a tool like jwt.io to check the contents of JWT tokens.
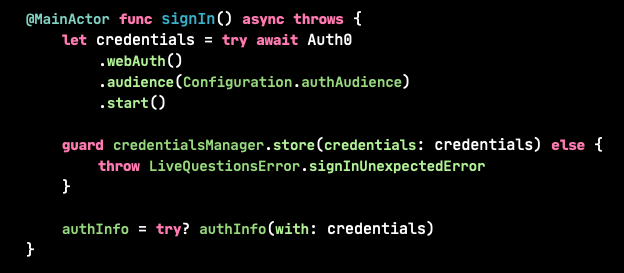
The audience parameter refers to the identifier of the custom Auth0 API that you will create for your backend. Don’t worry if you’re not sure what this means — we provide a detailed explanation of this step in the authentication section of our backend article.

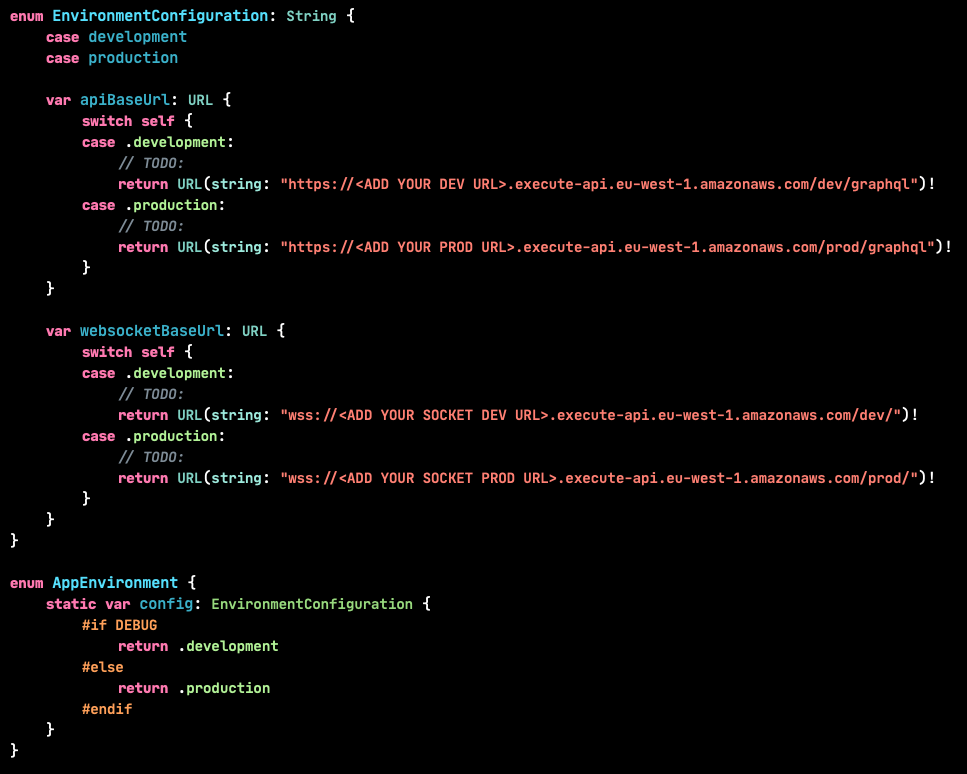
Environment Configuration
Whenever you deploy your Booster development or production environments, you’ll see the backend’s endpoints URLs printed in the console. Populate the EnvironmentConfiguration.swift file with these URLs:
And that’s it! You can now easily interact with your Booster backend from iOS. You can find more details about this app and other Booster use cases by exploring the iOS code on Github.
Conclusion
By using Booster, it is possible to create an enterprise-grade, scalable application without needing extensive expertise in cloud technologies or event-sourcing. We found the reactive nature of Booster to be very intuitive and effective in boosting productivity, and we truly believe it has great potential as a solution for building modern, feature-rich mobile apps.
Booster enables mobile engineers to quickly become full-stack developersand manage the backend of their application, making them more versatile and efficient.
Booster is constantly improving. The team is working on new features that will make our lives even easier in the near future. For instance, they are developing a native authentication solution, the ability to delete events and data permanently (currently only logical deletions are possible), and simpler storage options for file uploads. Stay tuned for updates!

If you have any questions or suggestions, don’t hesitate to reach out to us on Discord!