
Build scalable Low-Code backends with Booster 🚀
Are you a backend developer looking to significantly boost your productivity, or an iOS (or mobile) developer wanting to become a full-stackdeveloper in no time? Keep reading!

The Problem
When choosing a backend stack for a new app, developers often use no-code or low-code platforms like Firebase because they offer a variety of features. However, these tools might not be suitable for more complex data or situations requiring scalability and robust business logic.

On the other hand, using serverless solutions from scratch can be time-consuming and require a lot of effort to set up and manage.
You just want to move fast and care most about your business logic, right? The good news is that there’s a new framework called Booster that can make backend development a breeze, even for those who are new to it, thanks to its high level of abstraction.

Why this tutorial?
We are two developers from The Agile Monkeys with a strong background in iOS development, but very limited experience with backend production projects. Despite this, we have successfully used the Booster framework in several production projects! We want to share our experience with you, and for that we have created an open-source iOS app and an open-source Booster backend, as well as written two articles detailing the process.
- This tutorial covers the Booster backend, and the Booster code can be accessed here.
- A tutorial on the iOS integration can be found here, and you can view the iOS code here.
In addition, the iOS application built for this tutorial is available on the App Store. The app, called Live Questions, is a tool for live events, keynotes, and Q&A sessions that allows hosts to create a topic and gather questions from other users in real time.

To be transparent, Booster is actually a framework developed by another team within our company. Our backend and event-sourcing experts have been working on creating this high level of abstraction for years. As iOS developers, we have used Booster as if we were external clients of the tool, and have been extremely impressed with the developer experience and support we have received.

WTF is Booster?
In short, Booster is a Low-Code TypeScript framework that allows you to quickly and easily create a backend application in the cloud that is highly efficient, scalable, and reliable. It follows an event-driven, event sourcing, and domain-driven design (DDD) to achieve these goals and it reimagines the software development experience to maximize your team’s speed and reduce friction on every level.

The event-driven design of Booster means that the server is designed to process and respond to events rather than traditional requests, making it highly efficient as it can process multiple events concurrently and asynchronously.
The event sourcing design of Booster stores all changes to the state of the backend as a sequence of events, like an event log, rather than in a traditional database. This allows the backend to reconstruct the current state of the system at any point in time and makes it easier to track and debug changes to the system. It also allows for the easy implementation of new features by replaying stored events.

Finally, the Domain-Driven Design of Booster involves breaking down the system into small, cohesive components that represent different business entities and their relationships. This helps to create a backend that is more scalable, maintainable, and adaptable to changing business needs.
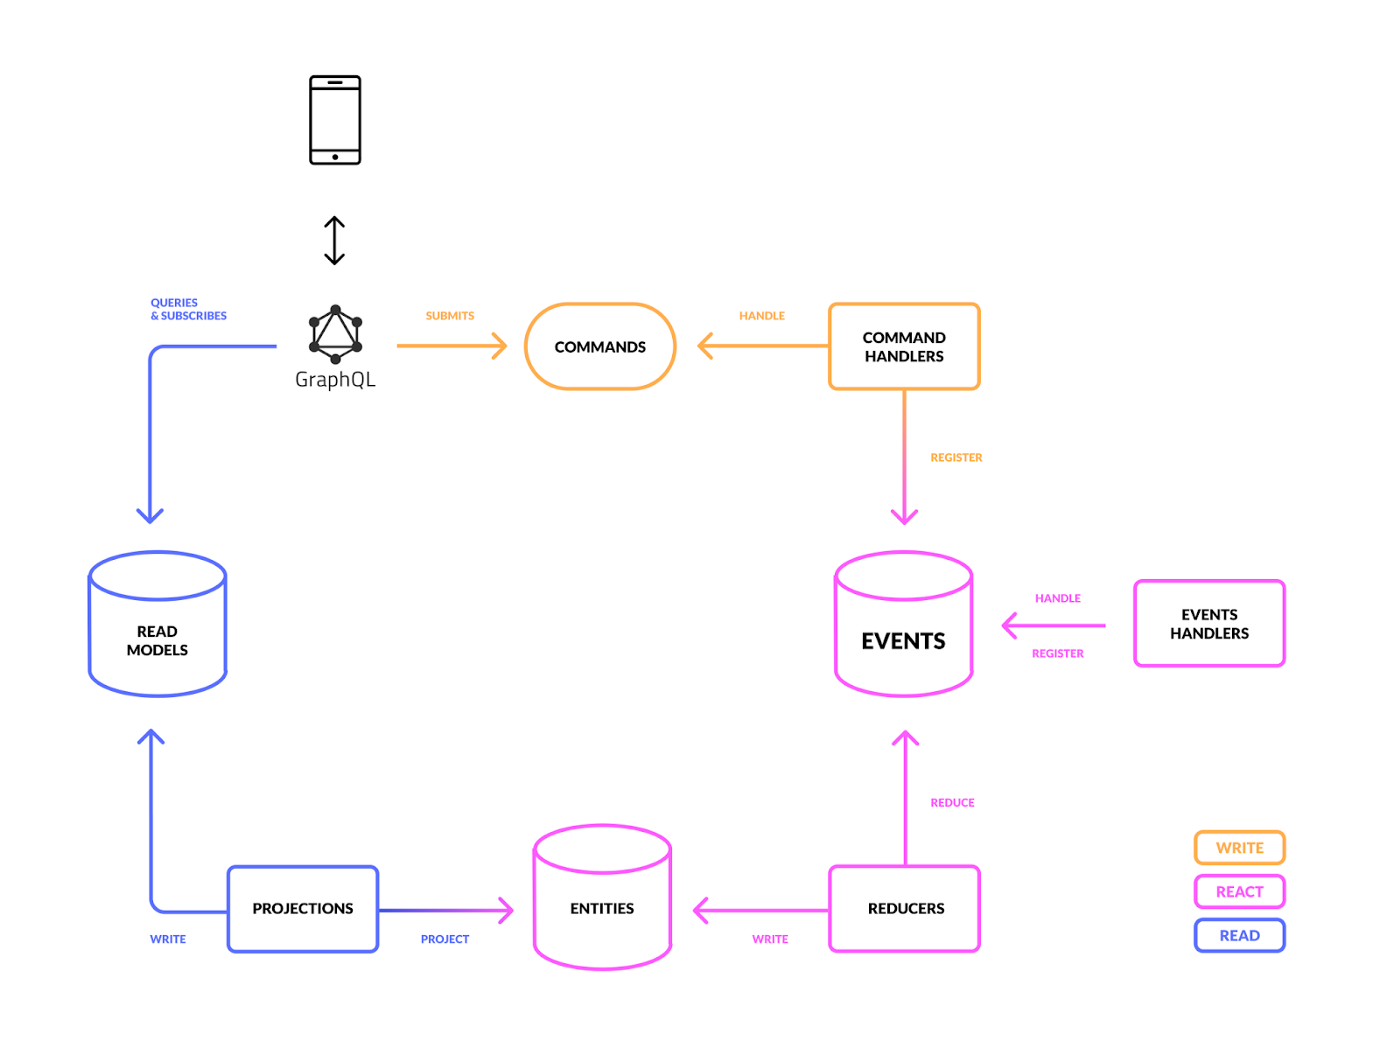
A backend project using Booster is organized, on-rails, into the following components:
- Commands: Actions that users can take within the system (e.g. create a topic).
- Events: Simple records of facts (e.g. user X reacted to question Y on topic Z). As Booster is an event-driven framework, events are central to the design of a Booster project.
- Entities: The source of truth, representing data about the subjects discussed within your company (e.g. topics, questions, users).
- ReadModels: Public projections of Entities. While Entities are private within the system, ReadModels are publicly accessible (e.g. get topics).
- Handlers: Code that processes commands, reacts to events to trigger other actions, or updates Entities based on new events.
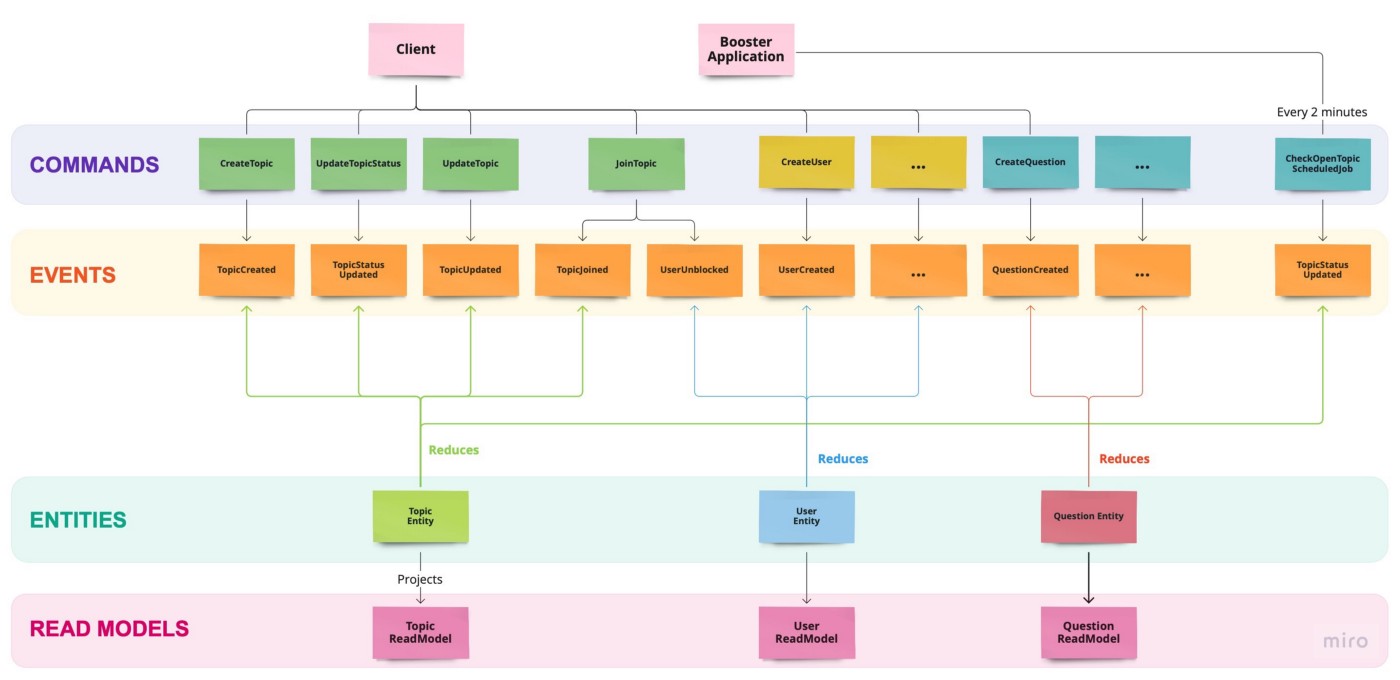
Modeling a reactive backend is made easy with these building blocks! The high level of abstraction makes it intuitive, even for non-technical people. As an example, here is a subset of the backend we created for the Live Questions app:
Let’s create our Booster backend!

Before starting, it is recommended that you open our open-source repositoryand refer to it as a guide during this process.
1. Install the Booster CLI
Booster is supported on macOS, Windows, and Linux. You can follow the installation steps on this page.
2. Create the Booster project
Navigate to the root folder of your new project, and then run the following command in the Terminal:
boost new:project [Project-Name]
Follow the prompts and select one of the available cloud providers as the main provider for your project. We recommend AWS for this project. You first need to set up a free AWS account in order to deploy your project.
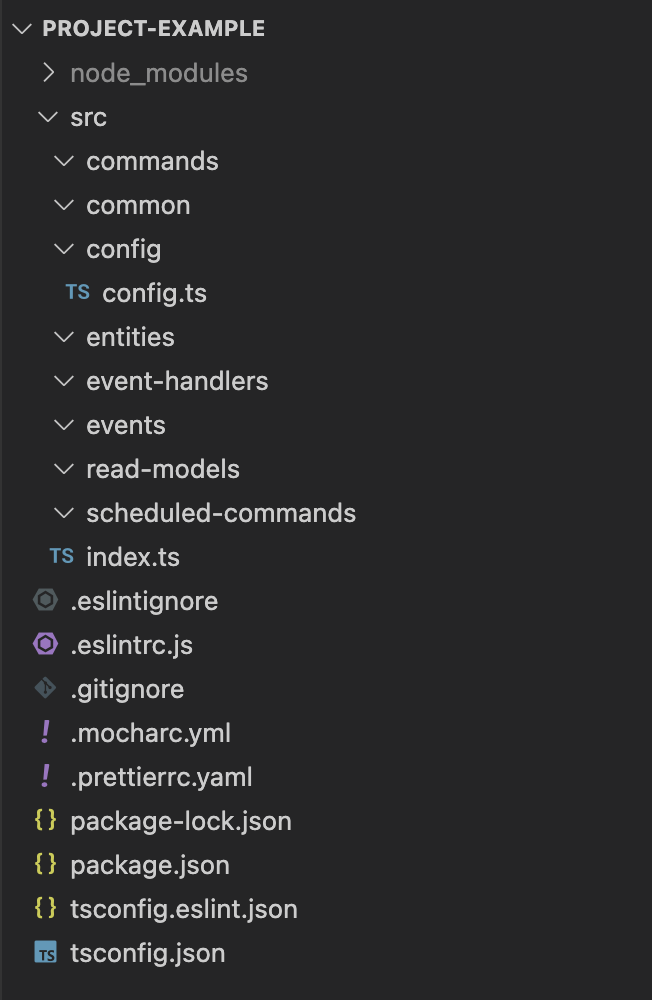
After running the command to create your project, you will have a properly configured Booster project that you can open in your preferred code editor (such as Visual Studio Code or VSCodium).
The project folder will contain configuration files and empty folders for you to add your commands, entities, events, etc:
For more detailed information about creating a project with Booster, refer to the official documentation.
3. Create Commands
Commands are input for our system that are typically initiated by the users of our application. Upon receipt, we can validate the data, perform any necessary business logic, and register one or more events.
To create a new command, you can use the command line generator in the root directory of your project (you can also create the file manually). Here is an example of how to do this:
boost new:command CreateTopic --fields title:string timeToLive:number
This command will create a TypeScript file called ‘create-topic.ts’ in the ‘src/commands’ directory. The ‘fields’ flag is optional, and you can also add attributes to your command through code after the file has been created.
You can specify who is authorized to execute the command by adding the authorized roles. For now, you can use ‘all’ to authorize anyone. We will discuss user authorization in more detail later.
@Command({authorize: 'all'})export class CreateTopic {…}
To know more about commands, refer to the official documentation.
4. Create Events
Rather than creating, updating, or deleting objects, Booster stores data in the form of events, which are records of facts and serve as the source of truth. To generate an event called ‘TopicCreated’ with initial topic information, run the following command:
boost new:event TopicCreated --fields topictId:UUID title:string
This command will create a new file in the ‘src/events’ directory. Once you have created all your events, return to your commands to register them. To know more about events, refer to the official documentation.
5. Create Entities
Entities represent the internal state of our system and are responsible for combining all events with the same entityID. To create an entity, run the following command:
boost new:entity Topic
This command will create a new file in the ‘src/entities’ directory. Once you have added all your entities, you can use them to reduce events and update the entity state. To know more about entities, refer to the official documentation.
6. Create Read Models
In a real application, it is often necessary to limit access to the full domain model (entities), and different users may have different views of the data depending on their permissions. Read models provide a solution to this problem by projecting one or more entities into a new object that can be accessed through a GraphQL query or subscription.
To create a read model, run the following command:
boost new:read-model TopicReadModel --projects Topic:id
The ‘ — projects’ flag allows you to specify the entities that the read model will observe for changes to project onto the read model. The ‘:id’ after the entity name is the join key.
As mentioned earlier when creating commands, you will need to specify who is authorized to query your read models. For now, you can use ‘all’.
To know more about read models, refer to the official documentation.
7. Local Testing

We have:
- Created a publicly accessible command
- Emitted an event as a mechanism for storing data
- Reduced the event into an entity to represent the internal state of the system
- Projected the entity into a publicly accessible read model
To ensure that your code is error-free and compiles correctly, run the following command:
boost build –verbose
To start the application locally:
boost start -e local
This will execute a local Express.js server and try to expose it on port 3000. Booster applications come with a GraphQL API out of the box, which you can use to send commands through mutations and retrieve read model data through queries or subscriptions.
For testing in local or development environments, we suggest using the Altair GraphQL client. Simply enter the endpoint URL for your application, which is located at http://localhost:3000/graphql. It will also load the documentation for your API schema!
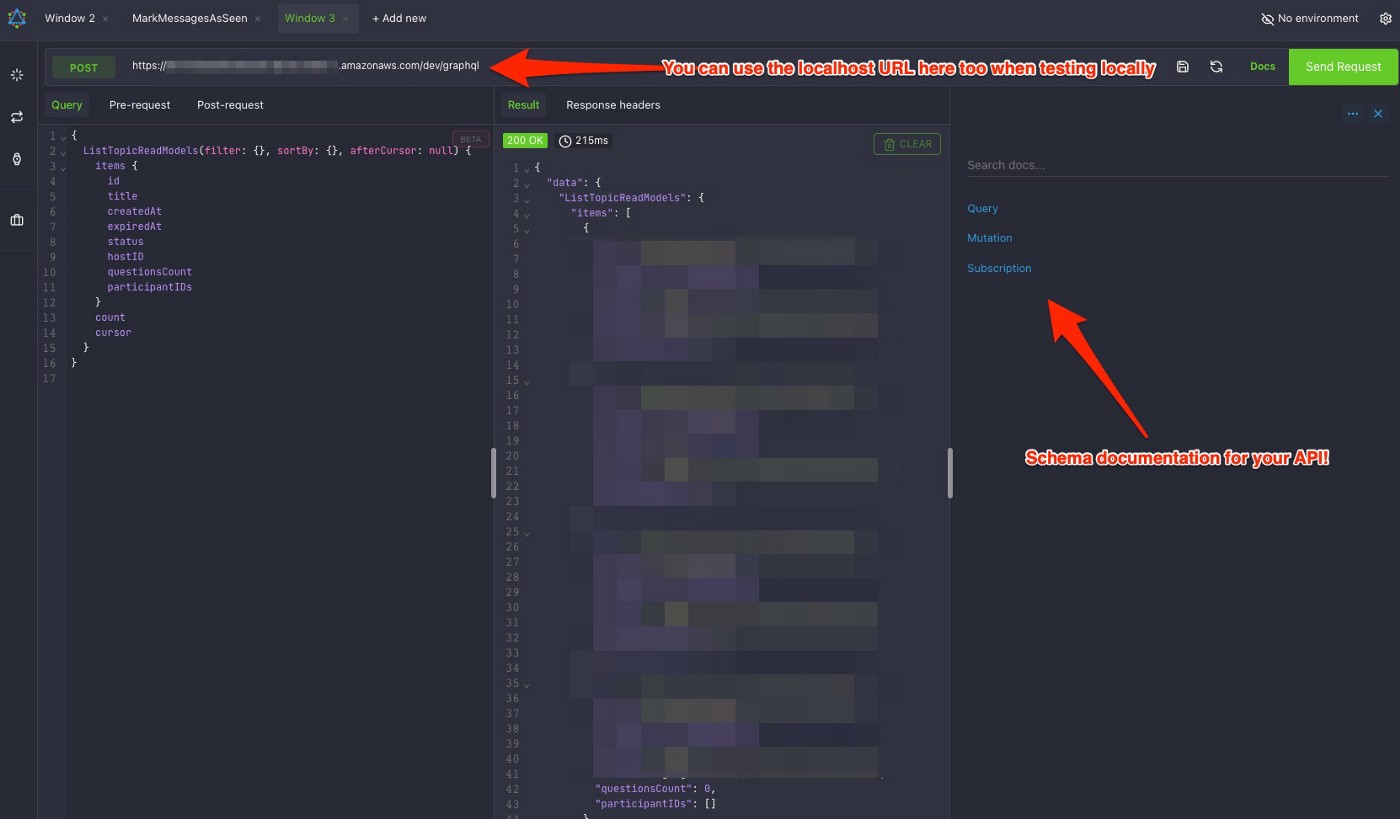
If you are testing a deployed backend (not on your local machine), the endpoint URLs will be displayed in the console after a successful deployment to AWS.
Keep in mind that subscriptions are currently not supported in a local environment. For that, you need to deploy the app to AWS.
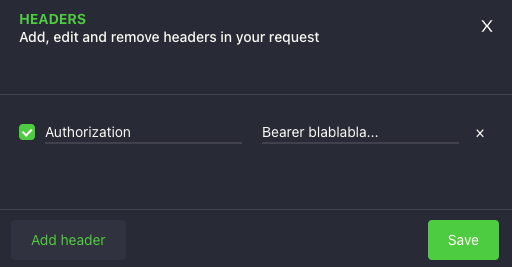
In order to ensure that only authorized users can access data or perform actions on the system, it is important to include an ‘Authorization’ header with the value ‘Bearer <user_valid_access_token>’ in your requests using Altair for commands or read models that require authorization. Don’t forget to do this when making requests:
Note that if you are testing some Commands locally and don’t want to deal with the authentication part (we explain authentication later in the article), you can just keep the Command public and authorize it for ‘all’:
@Command({authorize: 'all'})export class CreateTopic {…}
8. Configuration
The config.ts file is where you can configure the environments you will be using in your project. If you take a look to our config file:
function buildEnvironment(environment: Environment): void { Booster.configure(environment.name, (config: BoosterConfig): void => { config.appName = environment.appName config.providerPackage = packageOfProvider(environment.provider) switch (environment.provider) { case EnvironmentProvider.Local: config.logLevel = Level.debug break case EnvironmentProvider.AWS: config.logLevel = Level.debug config.assets = ['.env'] // Needed for secrets. Fill your secrets in the .env file. config.tokenVerifiers = [ new JwksUriTokenVerifier( environment.auth0Issuer, environment.jwksURL, "custom:roles" ) ] break } })}buildEnvironment(productionEnvironment)buildEnvironment(developmentEnvironment)buildEnvironment(localEnvironment)dotenv.config()
It is generally best practice to store sensitive information, such as passwords or API keys, in environment variables rather than hardcoding them in your code. This helps to prevent accidental exposure of sensitive information, such as when committing code to a public repository. The dotenv module can be used to separate environment-specific configuration from your code, making it easier to manage and deploy your application. It loads environment variables from a .env file, as seen in the line config.assets = ['.env']. This file can be used to store your Auth0 secret keys, which will be discussed later in the authentication portion of the tutorial.
To add the dotenv module or other dependencies to your project, you can use the npm install command, for example: npm install dotenv. This will add the dependency the project's package.json file, as shown in the example below:
{ "name": "livequestions", "description": "Backend of the questions gathering app", "version": "0.1.0", "author": "The Agile Monkeys", "dependencies": { "@boostercloud/framework-core": "^1.3.0", "@boostercloud/framework-provider-aws": "^1.3.0", "@boostercloud/framework-types": "^1.3.0", "auth0": "^2.30.0", "dotenv": "^16.0.0" },[...]
To install all dependencies already defined in the package.json file, you can simply run npm install.
Additionally, you may want to take a look at the environment.ts file we created to abstract the details of each environment:
[...]export const developmentEnvironment: Environment = { name: 'dev', appName: 'livequestions-dev', provider: EnvironmentProvider.AWS, auth0Issuer: "<AUTH0_ISSUER>", // Example: "https://blablabla.eu.auth0.com/", jwksURL: "<AUTH0_JWKS_URL>" // Example: "https://blablabla.eu.auth0.com/.well-known/jwks.json"}[...]
9. User Authorization with Auth0

To ensure secure access, Booster uses the OAuth 2.0 protocol for authentication. This protocol involves the use of JSON Web Tokens (JWT) to identify and authorize users. These JWT tokens, also known as access tokens, are issued by an authentication provider such as Auth0, which we are using in this project. Other popular providers that support OAuth 2.0 include Firebase and others.
As mentioned in our iOS tutorial, we are utilizing Auth0 for user authentication in our system. In addition, we will be implementing a role-based authorization mechanism in the Booster backend to ensure that only authenticated users with the appropriate role can perform certain actions. To begin, let’s create the roles.ts file and define the UserRole:
import { Role } from '@boostercloud/framework-core'@Role()export class UserRole {}
While we could define additional roles, such as Admin, for the purposes of this tutorial we will only be adding one role to keep things simple.
To begin using Auth0 for your experiments, create a free account and then go to the Applications section to create a new API called ‘Booster API’.

Remember the environment.ts file? There we can add the issuer URLs that Booster will use to validate the token:
export const developmentEnvironment: Environment = { name: 'dev', appName: 'livequestions-dev', provider: EnvironmentProvider.AWS, auth0Issuer: "<AUTH0_ISSUER>", // Example: "https://blablabla.eu.auth0.com/", jwksURL: "<AUTH0_JWKS_URL>" // Example: "https://blablabla.eu.auth0.com/.well-known/jwks.json"}
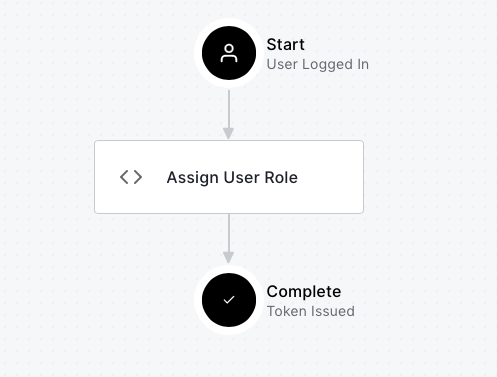
Now we need to add a custom claim to our Auth0 token that Booster will use to get the allowed role (in this case our role is UserRole). To do this, we will create a custom action called ‘Assign User Role’ that will be executed every time a user logs in and before the token is issued:
Inside the code for the Auth0 action, we will add a key-value claim that Booster will look for within the token:
exports.onExecutePostLogin = async (event, api) => { if (event.authorization) { api.idToken.setCustomClaim("custom:roles", "UserRole"); api.accessToken.setCustomClaim("custom:roles", "UserRole"); }}
If you remember our config.ts in Booster, we had that key defined at the token verifier level:
[...]case EnvironmentProvider.AWS: config.logLevel = Level.debug config.assets = ['.env'] config.tokenVerifiers = [ new JwksUriTokenVerifier( environment.auth0Issuer, environment.jwksURL, "custom:roles" // <-------- ) ][...]
Now Booster and Auth0 are working together!
You can now add proper role-based authorization to your commands and read models!
@Command({ authorize: [UserRole]})@ReadModel({ authorize: [UserRole]})
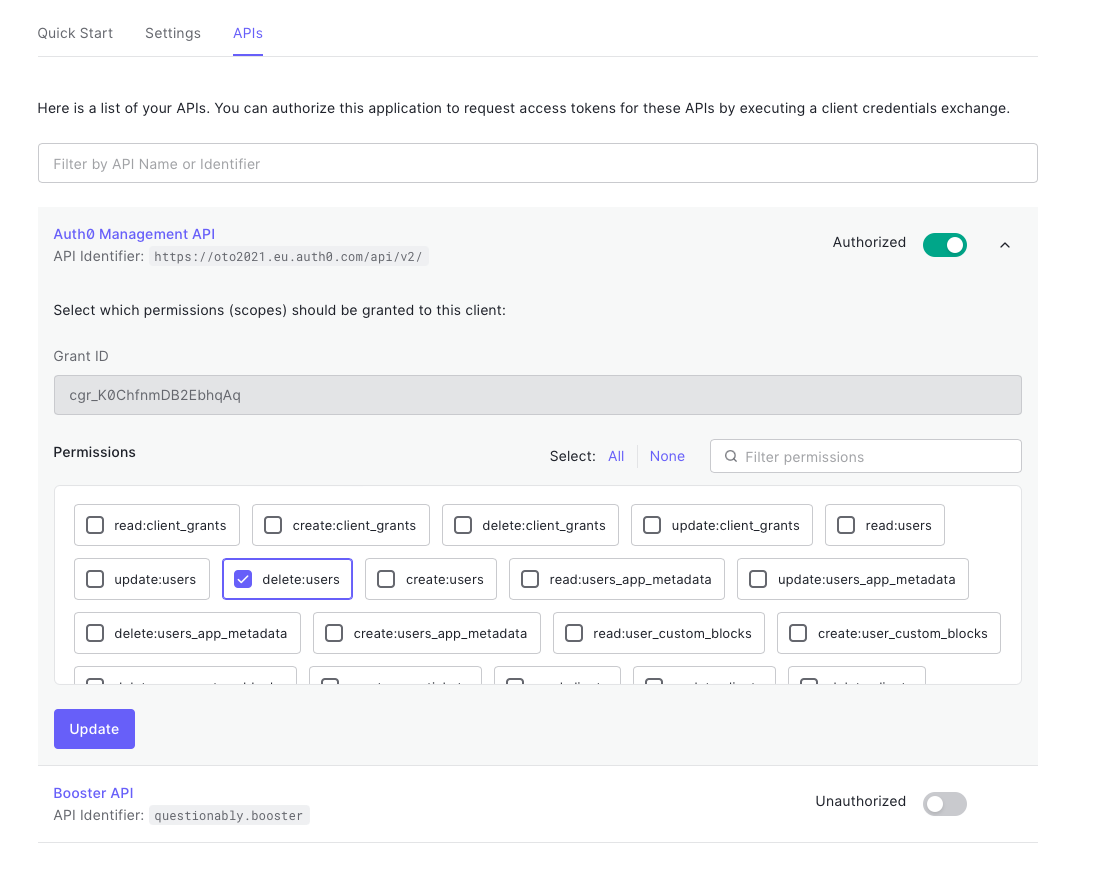
But we are going to go a step further and allow Booster to trigger user accounts deletions in Auth0 for the deletion feature. For that, we need to grant Booster access to the Auth0 Management API.
Go to the Applications section in Auth0 and create a new Machine-to-Machine application called “Booster Users Management.” In the APIs tab, ensure that this application has access to the Auth0 Management API and enable the “delete:users” permission.
Now, in Booster, you need to add the Domain, Client ID, and Client Secret values of this Machine-to-Machine application to the .env file that we previously mentioned:
AUTH0_DOMAIN_DEV=TODO // Example: blablabla.eu.auth0.comAUTH0_CLIENT_ID_DEV=TODOAUTH0_CLIENT_SECRET_DEV=TODO
Install the auth0 dependency in Booster:
npm install auth0
You can check how we call the Auth0 Management API from the delete-user.ts Booster command:
[...]@Command({ authorize: [UserRole], before: [CommonValidations.userValidation]})export class DeleteUser { public constructor() {} public static async handle(command: DeleteUser , register: Register): Promise<void> { const userID = getUserId(register) const environment = currentEnvironment() /// Delete user from Auth0 const management = new ManagementClient({ domain: process.env[`AUTH0_DOMAIN_${environment.name.toUpperCase()}`]!, clientId: process.env[`AUTH0_CLIENT_ID_${environment.name.toUpperCase()}`], clientSecret: process.env[`AUTH0_CLIENT_SECRET_${environment.name.toUpperCase()}`], scope: 'delete:users' }) await management.deleteUser({ id: userID })[...]
It’s important to note that we have already initialized the dotenv library with the dotenv.config() function in the config.ts file.
To know more about authorization, refer to the official documentation.
10. Deployment
Now that we have our environments and roles are properly configured, we can deploy our application to the cloud!
boost deploy -e dev --verbose
The ‘-e <environment name>’ flag specifies which environment to deploy.
By running the ‘deploy’ command, Booster will handle the creation of all necessary resources in AWS, such as Lambdas and API Gateway, and configure the necessary permissions, events, and triggers to connect them. It even creates a fully functional GraphQL API. Forget about infrastructure code!

Worth mentioning
Logging
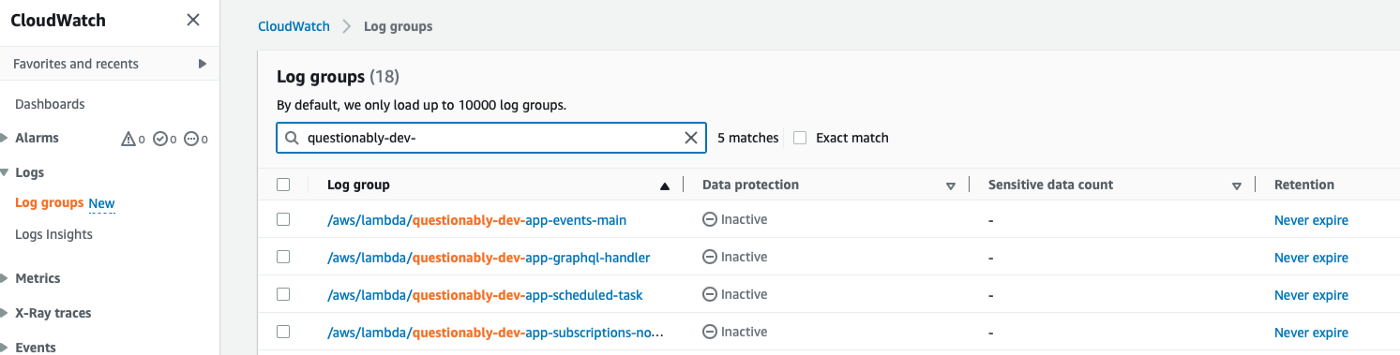
You can check the application log groups in CloudWatch, in your AWS account:
To know more about logging, Refer to the official documentation.
Error handling
Data deletion
As you know, Booster uses event sourcing to store and manage changes to an application’s state by recording them as a sequence of events in an event store. Deleting data can be challenging in event sourcing because events are typically append-only and may have dependencies on other events. Currently, the Booster framework only supports soft deletion. Hard deletion, which permanently removes events from the event store, will be supportedin the near future!
With soft deletion, you can mark entities as deleted by adding a new event indicating this, rather than deleting the events themselves. This allows you to maintain the integrity of the event stream while still effectively deleting a read model. For example, in our application, we can update a topic or question entity to a deleted state. We also support deletion of users. We encourage you to check these use cases.

Migrations
When implementing a Booster application, you may need to update your entities and perform some schema migration. While data migrations are supported in Booster, they can be complex and require careful planning and testing.
During the development phase, when the state of your application is not critical, it may be easier and faster to delete all of your data directly from your cloud provider and redeploy your application because having incompatible versions of events can prevent Booster reducers to work. This will help you avoid any inconsistencies in the system and make the migration process simpler.
Conclusion
By using Booster, it is possible to create an enterprise-grade, scalable application without needing extensive expertise in cloud technologies or event-sourcing. We found the reactive nature of Booster to be very intuitive and effective in boosting productivity.
Booster is constantly improving. The team is working on new features that will make our lives even easier in the near future. For instance, they are developing a native authentication solution, the ability to delete events and data permanently, and simpler storage options for file uploads. Stay tuned for updates!
Remember that we’ve also written an article on how to use a Booster backend with an iOS app.
If you have any questions about these articles or want to learn more about using Booster, or if you’d like to contribute to this open source framework, come and join us on Discord! Our community of developers is always happy to help and share their knowledge, no matter your skill level. We hope to see you there!